Around this time, I was generously gifted an Ego tattoo machine from an artist at the Studio, Pete. Ego is the brand of tattoo machines created by Bez which are created ergonomically with different iterations to match the variety of styles of working for tattooists. The machine given to me at this point was one of the original Ego machines, which many of the artists working in the studio had never seen before. The knowledge of the machines rarity enriched it with a level of significance that made my possession of it seem particularly important to me.
To set up for tattooing of the fake skin, I was asked to take out one of the stencil exercises that I had produced previously and use it as a transfer. Bez selected a design by the artist Dan Hartley, which was a small devil holding a large capital letter ‘G’. The design was comically tacky, which added a level of light-heartedness to the exercise that seemed to reduce my anxiety to some extent.
To create a stencil normally, the design would normally be photocopied and placed in a treble layered sheet of transparent paper, carbon paper, and a yellow-toned paper that the design is placed on face-up. The three sheets with the design inside are then placed in a plastic wallet which is put through a thermal image transfer machine. The machine can be run at a variety of speeds, with the faster speeds producing the weakest stencil (more suited to smaller, delicate designs) and the slower speeds producing the strongest stencil (most suited to more bold and graphic designs).
Once the stencil has been put through the machine the trio of sheets is removed, and the top layer of translucent paper has an imprint of the design that was placed onto the bottom sheet. For this stencilling technique, the image was drawn manually however, as the exercise was already completed of creating a carbon copy. The procedure for hand stencilling is similar, however the design is simply placed onto the carbon paper and traced (firmly) with a ballpoint (or other hard nib) pen, with the reverse of the design then holding a carbon copy which can be applied to the skin, leaving a purple stencil as a map for the tattoo.
The fake skin is particularly thin and beige in colour, and can be compared to ‘Bernard Matthews wafer thin turkey ham’. Before applying a stencil, the skin had to be placed onto an object to hold it. Another artist in the studio was once sent a prosthetic arm to tattoo a design on (known as a ‘pound of flesh’), so the fake skin was wrapped around the fake arm, and taped with duct tape. The texture of the skin was repellent to any adhesive of the tape, so it proved difficult to secure the skin onto the arm.
Once the fake skin was on the arm, a small amount of stencil fluid was applied until tacky. The stencil fluid tends to be white in the bottle but transparent once applied to the skin, and acts as a means to hold the carbon copy onto the skin. The design was then applied, to the fake skin slowly, and peeled away from the corner to avoid any ‘smudging’. Once successfully applied, the design then had to be left for a few minutes to dry before any tattooing could begin. This was in order to avoid any smudging while tattooing. I was told at this point that this would generally be the point when the tattooist would go outside for a cigarette (though in my case, I just waited as I don’t smoke).
Despite there being no potential for any health hazards with the tattoo being applied to fake skin, I set up the booth as I would for a client. The bed and trolley where wrapped with cling film, and the machine and cable where bagged and protected accordingly. Ink caps filled with black ink where placed onto the cling film covering the trolley, which was adhered by petroleum jelly. The fake arm holding the skin was placed on the cling film protected bed, and the machine was switched on.
The first thing I noticed when holding the machine was the unfamiliar vibrating sensation, coupled with the unusually shaped instrument in my hand. There are two types of tattoo machines; the traditional coil machine, which is a heavy and loud, or the contemporary rotary machine, which is much lighter in weight and quieter in sound. While many tattooists have now opted for rotary machines, some more traditional artists have continued with coil machines, which seems to be down to personal preference. The Ego machine that I was holding was a rotary machine, which had a tube attached which had an attachment for a variety of needle cartridges. The piece I was to attempt was a thick-lined, traditional piece, and so the machine was set with a ‘9-liner’ (9 small needles grouped together).
With the supportive presence of a number of tattooists surrounding me, I attempted my first line into the design on the skin. The ink that was applied to the machine dispersed rapidly, obscuring the area I was tattooing, making it particularly difficult to see what I had tattooed. I was told this is something you get used to and intuitively understand in time. The fell of the vibrating weighted machine in my hand was so foreign that getting over the discomfort of that was a task alone, with utilising it to make marks with precision being a separately difficult task. The texture of the fake skin caused much of the stencil to disappear I was tattooing it.
As I tattooed, I was advised by Pete how to hold the machine so that I had one finger guiding the needle as it traced over the skin, allowing for a consistent depth. I was also advised to attempt to hold the machine upright to ensure a consistent line weight, and how to create a line that appears connected but may have been completed in multiple passes. This was done by continuing to line once the hand had been taken away from the skin in a position before the previous line had ended. I noticed the inaccuracies in the design, and so spent some time on the areas of skin around the stencil practicing line work. I was informed prior to the exercise that its purpose was merely in obtaining experience in holding the machine, and not in creating a visually pleasing tattoo. Having experimented with the line work, I realised how challenging it was to create a clean appearing tattoo and how many factors where to be considered to do it right. Unlike drawing and illustration, the canvas is human skin with totally different properties to paper, meaning stencils may disappear through wiping, the skin may get over-walked, and the canvas may move from the pain they are being inflicted. This exercise taught me how to both get used to holding a machine, as well as how to understand the logic of those responsible for bad tattoos.
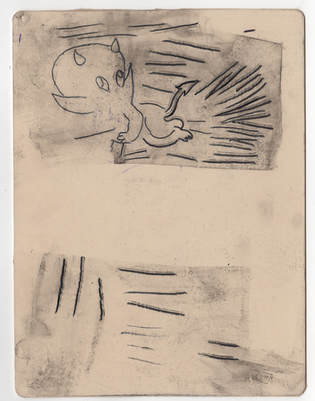
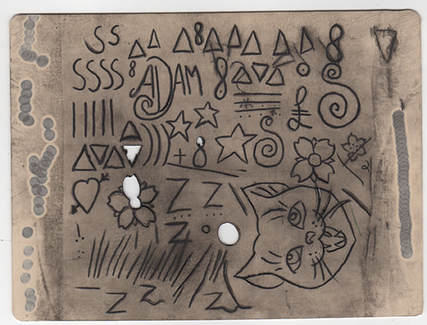
The images included are of my first 2 attempts on fake skin – the first of which has been described above (and is likely visually apparent). The area around the imagery that is of a lighter colour is the part of the fake skin that has been covered by tape, with the darker areas being the parts where ink has been wiped off from the tattooed line and resulted in staining. The second sheet of skin was mainly as a means of the consideration of lines and gaining comfort with the machine again, and included motifs and images drawn by Bez for the purpose of the task (in addition to one of the flash designs for Friday the 13th created by the artist Stacey Green).
The fake skin practice is integral in the gaining of tacit knowledge that simply couldn’t be learned without empirical understanding. I am writing retrospectively and have since tattooed 3 more pieces of fake skin with increasing success – the pieces shown are artefacts of my very early stages of incompetence that I am now in the process of attempting to better. Tattooing practice is integral to the discipline and the reason it functions as a commercial art form, however there is so much more to the process than the act of doing. My time up until holding a machine has been focussed on gaining the necessary understanding of studio functioning that is a key part of the job. The use of a machine discussed here is the seminal moment of the next iteration of my career progression.
Adam McDade
Illustrator, Tattoo Apprentice, and PhD Research Student.


 RSS Feed
